After all of the mental exercise in the last article A Plan Comes Together, it is time to get back to work. Winter is whizzing by, and I had to be ready when spring arrived to uncover this mess and erect the permanent roof.
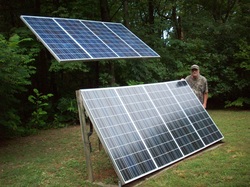
The starter solar power system I had installed was working flawlessly, which allowed the long winter to pass relatively quickly. During this time, I assembled the front half of the side walls, then pre-cut all of the rafters and collar ties, to be ready to go in spring when the weather broke. I also pre-cut stringers for the stairway, since the first thing I would need to begin the roof would be access to the loft floor. If, and when, a dry spell arrived and the cover was removed, roof construction had to move swiftly and seamlessly. I thought about this operation constantly, and prayed very hard that all of my calculations were correct! If not, I would have a “mell of a hess” on my hands.
The starter solar power system I had installed was working flawlessly, which allowed the long winter to pass relatively quickly. During this time, I assembled the front half of the side walls, then pre-cut all of the rafters and collar ties, to be ready to go in spring when the weather broke. I also pre-cut stringers for the stairway, since the first thing I would need to begin the roof would be access to the loft floor. If, and when, a dry spell arrived and the cover was removed, roof construction had to move swiftly and seamlessly. I thought about this operation constantly, and prayed very hard that all of my calculations were correct! If not, I would have a “mell of a hess” on my hands.
At one point in the middle of all this commotion, a few days of clear, dry weather appeared. I decided to raise the front of the plastic off the floor and install the front side walls. As it turned out, the break in weather was only long enough to erect one side wall, which dictated that I re-cover with the plastic, then wait for a second opportunity to do the other side. In about a week, the weather window opened and allowed the installation of the other front side wall. The hard part of this operation was not erecting the walls, but trying to re-cover everything for protection.

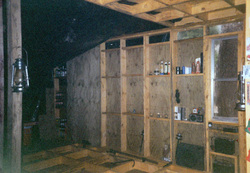
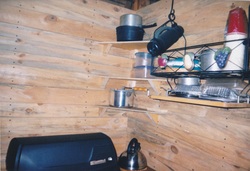
Now, with the side walls completed, I concentrated on the floor plan again. I decided to go in the rear east corner and create a “kitchen.” I built a wall six feet long and installed it six feet from, and parallel to, the rear wall, attached to the east wall. I then covered the front of this wall with 1x pine planks that were sawed from the property. I left the “kitchen” side bare and used the cavities in the framing for storage. This arrangement proved very handy, and is still in use today. The picture of the kitchen corner shows the top of the propane grill I used as a cooking stove. After almost killing myself previously, I made sure to open a window when it was in use. Ventilation is paramount!
In the rear wall, centered underneath the double windows, I installed a double bowl kitchen sink, using 5/8 inch plywood with two coats of polyurethane as a countertop. My builder friend supplied the ceramic splash block, at no charge. I had previously installed the drain for the sink. We now have a functional “kitchen". Next, I moved to the problem of refrigeration. I decided to locate the fridge on the opposite side of the building from the “kitchen stove.” Being only 20 feet wide, this was not a great distance, but made more sense than putting it right beside the stove. The southwest corner was least desirable, and the “cooler box” and stove should have been switched. I plan to swap their locations in the final plan across the road. A lesson learned!
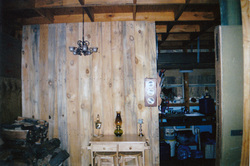
So, in the rear western corner, I built a wall four feet long and positioned it forty inches from, and parallel to, the rear wall, attached to the west wall. An interior door was installed, the cool side insulated with ½ inch closed cell foam having a 4.2 R-value. Plans were to double the foam in the future. The six inch wall cavities were filled with the same foam board cut to fit, then R-19 faced fiberglass was used on top of the foam, yielding a 23.2 total R-value. A length of pipe insulation was cut lengthwise and affixed to the bottom of the door to serve as a threshold seal. We now have a “cooler box”.
What appliance do we need to use? Because of the high run time, I chose an ultra-efficient 12 volt Novacool 4.3 cubic foot model, purchased from Backwoods Solar Electric Systems. When it arrived, I perused the instructions, which discussed adding extra insulation. What a novel idea! I had never thought about that. As per the “dummy sheet,” I removed the screws attaching the condenser coil, to loosen it and pull it away from the rear of the box just enough to add 3 inches of extra foam insulation. There was not room for more. The compressor chassis was loosened, to install 2 inches of foam around it. The top, bottom, and sides got 6 inches added, with 3 inches applied to the door. I was amazed at how easy the operation was, and this can be done to any fridge. In the future, I will do this to any refrigerator I use!
I next built a shelf inside the box, on which to set the fridge. The shelf was located thirty-seven inches off the floor, spanned the width of the entire cooler box, depth matching the fridge. The extra-insulated fridge was placed on the shelf with the rear against the west wall, the left side against the south wall. Before placement, I cut rectangular holes in the west wall at the fridge’s rear, then installed foundation vents upside down on the exterior wall. This would allow the compressor section to vent heat to the outside, and prevent heat build-up inside the cooler box. After the fridge was placed on the shelf, the left front side, right rear side, and top were caulked to block compressor heat from entering the box. The fridge door was configured to open from right to left.
Lastly, I inserted a one-and-one half inch pvc pipe into the rear wall, as high as possible, to serve as a vent for the entire box. A valve was included in the pipe, inside the cooler box, to open and close with the seasons. In summer, the valve remains closed. In winter, the valve is opened to allow cool air in. This uses outside air to keep the box at minimum temperature.
Finally, after all this planning and work, we have an ultra-efficient refrigeration capability. The set-up has resulted in a fridge run-time, or duty cycle, of about 20%. Using 12 volts, and only running 20% of the time, the resulting electrical need has been minimal. Everything still works as well as the day of installation, requiring no maintenance or repairs to date, which has left plenty of time to reuse and recycle any and everything!
All photos by Jeff & Kathy Chaney
Visit us at: Natural Power & Light , Mother Earth News , & Facebook
 RSS Feed